영상처리 공부
- jupyter notebook사용 (anaconda)
- pytorch 사용
1. pytorch tutorial (pytorch_tutorial_cnn)
tensor 사용방법 : tensor tutorial
- torch : numpy와 비슷한 기능 제공. 간혹 numpy와 torch 다른 부분이 있을 때에는 totensor등을 사용해서 tensor로 변환하기
- cuda : GPU사용관련 기능
convolution filter 연산 구현 : filter 구현해보기
- convolution filter 연산 구현 : padding, stride도 구현해봄
CNN 구현 : CNN 구현
- ( convolution layer -> maxpooling layer ) * 5 -> classification layer(linear layer)
2. 이미 잘 알려진 Net 구현 (classification_net)
구현 : Lenet, Alexnet, VGGnet, googlenet, ResNet
-
Lenet(Lenet 구현) : 시초 net, 굉장히 간단한 구조, 5x5 filter 적용
-
Alexnet(Alexnet 구현) : Lenet보다는 복잡하지만 그래도 단순한 구조, parameter 및 연산량이 Lenet보다 많아짐
- 보통 parameter수와 연산량은 convolution layer보다는 classification하는 linear layer에서 굉장히 많음
- convolution layer parameter 수 : (filter 11x11x3가 96개 있는 경우 : (11x11x3+1)x96 = 14kB)
- linear layer parameter 수 : (linear(4096,4096) -> 4096*4096 = 160M)
- linear layer보다 더 적은 parameter수를 가지는 convolution layer의 parameter수도 임베디드/모바일에서 처리하기 힘든 양임
- 보통 parameter수와 연산량은 convolution layer보다는 classification하는 linear layer에서 굉장히 많음
-
VGGnet(VGGnet 구현) : alexnet보다 더 복잡해진 구조, 더 성능이 좋아졌으나 연산량도 굉장히 많아짐
- VGG net은 여러 버전이 있음 (11 layers ~ 19 layers)
- 성능은 19layer가 가장 좋음(VGG19)
- 많이 쓰이는 것은 16layer(VGG16)
- 구현 : VGG11, VGG16, VGG19
-
GoogLenet(GoogLenet 구현) : 층은 더 깊어졌지만, 연산량을 대폭 줄임(1x1 convolution layer, 중간 결과 내높음 - 자세한 설명은 해당 링크에 가면 있음)
- 구현은 inception block만 구현해봄
-
ResNet(ResNet 구현) : 층을 더 깊이 만들면서도 본래의 특징을 유지하는 방법, 요즘 대부분의 net은 resnet의 개념을 적용함
- resnet도 여러 layer가 있지만, 34 layer 구현해봄
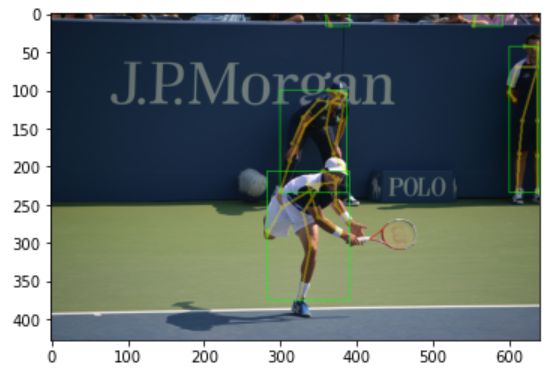
6. pose estimation (pose_estimmation)
pose estimation 설명 : 위 링크의 readme참고
- 관절위치 heatmap으로 어떻게 표현하는가(가우시안을 사용해서 표현할 수 있음)
-
bottom-up방식 사용함 : but 보통의 경우 top-down사용하니깐 나중에 top-down으로 해보기
-
heatmap(관절위치) + part affinity fields(조립시 필요한 부가정보 - 방향계산함)
-
openpose정식버전은 feature extraction으로 VGG19사용하지만, lightweight버전은 더 가벼운 mobilenet을 backbone으로 사용함
-
사용 결과
7. GAN(GAN; 설명-readme확인)
- generator,discriminator모두 linear로만 이루어진 간단한 model이지만, 시간 많이 걸림(이미지 사이즈 늘려가는 generator때문인듯)
- DCGAN완벽 구현은 아니지만 비슷하게 구현한 것 사용. conv로 이루어져 있어서 성능은 GAN보다 좋게 나오지만, 그말인 즉슨 시간은 훨씬 더 오래 걸림
- condition 정보까지 있어서 조작이 가능한 infoGAN
- onlycat파일은 문제가 있어서, concat파일을 돌려봄
- 역시 시간 많이 걸림, 그만큼 성능은 보장
| GAN | DCGAN | infoGAN |
|---|---|---|
 |
 |
 |
9. GAN2 (GAN2; 설명은 readme)
여러가지 GAN : pix2pix -> cyclegan -> singan, stylegan
구현 : styleGAN; 구현 무엇을 하였는지는 readme참고
-
사람 얼굴 이미지 -> projection : 사람 얼굴 복원(latent뽑아냄) -> latent이용해서 다양한 것을 할 수 있음(나이 변경, 캐릭터화 등등)
-
result중 일부; 캐릭터화
원본 이미지 projection(step 1500) toonify 


